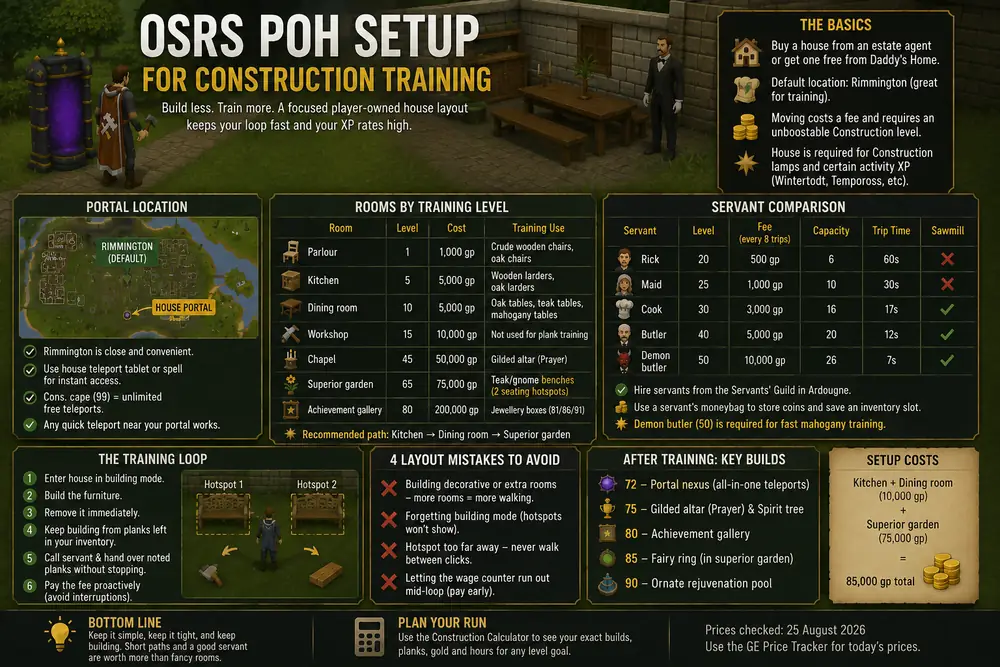
A player-owned house set up for Construction training needs exactly three things: a portal you can reach fast, one room matching your method, and a servant standing close to the hotspot. Everything else is decoration, and decoration costs you experience per hour.
This guide covers the portal choice, the rooms you need at each level, where to stand, and the layout mistakes that quietly cap your rate.
Getting a house
A house is bought from an estate agent, or received free on completing the miniquest Daddy’s Home. It starts in Rimmington by default and can be moved to one of eight other cities for a fee, provided you meet the Construction level for that location.
That level requirement is unboostable, so a spicy stew will not get you into a nicer town early.
Owning a house is also a prerequisite for two things unrelated to building: using an experience lamp on Construction, and gaining Construction experience from repairing Wintertodt braziers, Tempoross totems and masts.
Portal location
Rimmington is the default, and for training it is genuinely good. The portal sits close to where you arrive, so entering and leaving is quick.
Relocating is a fee plus a level requirement, and for pure training it changes very little. What matters far more is how you get to the portal in the first place:
- A house teleport tablet or the house teleport spell removes the walk entirely.
- The Construction cape at level 99 gives unlimited free house teleports, which is one of the few genuinely useful cape perks.
- Any nearby teleport that lands close to your chosen portal works fine.
If you already have a house somewhere for a gilded altar or a portal nexus, keep it there. Moving purely for a Construction grind is not worth the fee.
Rooms by training level
You only need the room matching the method you are actually training. Each is a one-off cost.
| Room | Construction level | Cost | Training use |
|---|---|---|---|
| Parlour | 1 | 1,000 gp | Crude wooden chairs, oak chairs |
| Kitchen | 5 | 5,000 gp | Wooden larders, oak larders |
| Dining room | 10 | 5,000 gp | Oak dining tables, teak tables, mahogany tables |
| Workshop | 15 | 10,000 gp | Not used for plank training |
| Chapel | 45 | 50,000 gp | Gilded altar at 75, not training |
| Superior garden | 65 | 75,000 gp | Teak garden benches, gnome benches |
| Achievement gallery | 80 | 200,000 gp | Jewellery boxes, not training |
The practical sequence for a training account is kitchen → dining room → superior garden. A parlour is worth 1,000 coins for the first eight levels and can be demolished afterwards.
The superior garden at 75,000 coins is the only room that costs real money, and it earns it back: two seating hotspots is what makes benches the fastest methods in the game. The gnome bench guide and the teak garden bench guide both depend on it.
Where to stand
The single largest avoidable loss is walking. Two positions matter.
Your build position. Stand where you can click the hotspot without moving. In a superior garden with two seating spaces, stand between them so both are reachable without a step.
Your servant’s path. The servant walks to you. Place the room so its route is short, and do not build rooms your character can path through on the way.
A training house should be small. Every extra room is another place the pathfinder can send you.
Servant setup
Every published experience rate for Construction assumes a servant fetching planks. Which one you need depends on the plank appetite of your method.
| Servant | Level | Fee | Capacity | Trip time | Sawmill |
|---|---|---|---|---|---|
| Rick | 20 | 500 gp | 6 items | 60s | No |
| Maid | 25 | 1,000 gp | 10 items | 30s | No |
| Cook | 30 | 3,000 gp | 16 items | 17s | Yes |
| Butler | 40 | 5,000 gp | 20 items | 12s | Yes |
| Demon butler | 50 | 10,000 gp | 26 items | 7s | Yes |
Servants are hired from the Servants’ Guild in Ardougne, and the fee is charged every eight trips rather than once.
Two practical notes. Reaching level 30 for the cook is worth a short detour before a long session, because it is the first servant that can visit the sawmill and its trip time is a third of Rick’s. And a servant’s moneybag lets you store coins for the fee, freeing an inventory slot during the loop.
The full servant comparison covers when each upgrade pays for itself.
The loop that produces real rates
- Enter the house in building mode with a hammer and saw.
- Build the furniture.
- Remove it immediately.
- Keep building from the planks left in your inventory.
- Call the servant and hand over noted planks, without stopping to build.
- Pay the fee proactively so the eight-trip counter never interrupts you.
Step five is where most of the rate lives. If you stand still while the servant walks, you lose a large share of every cycle regardless of which servant you hired.
Four layout mistakes
Building decorative rooms during a grind. Every room is a pathing hazard. Build the nice house afterwards.
Forgetting building mode. Obvious, and yet. Without it the hotspots are not visible.
A hotspot you have to walk to. If clicking the build spot moves your character, you have already lost the rate.
Letting the wage counter run out mid-loop. The payment dialogue interrupts at the worst moment. Pay when you think of it, not when prompted.
After the training is done
Once you have the levels, the house stops being a workshop and becomes infrastructure. The builds worth planning a permanent layout around are:
- Portal nexus, 72. One object holding multiple teleport destinations.
- Gilded altar, 75. Prayer training with bones, lit with incense burners.
- Spirit tree, 75 Construction and 83 Farming.
- Achievement gallery, 80, holding the jewellery boxes at 81, 86 and 91.
- Fairy ring, 85 in the superior garden.
- Ornate rejuvenation pool, 90.
That list is worth reading before you pick a training target, because most accounts stop somewhere in it rather than at 99. The 83 vs 91 vs 99 comparison covers the decision.
Costing the setup
Room costs are trivial next to plank costs. A kitchen, dining room and superior garden together come to 85,000 coins, less than fifty mahogany planks at 25 August 2026 prices.
The number that decides your project is the plank count. Open the Construction calculator, paste your current experience, set your target and pick your method. It returns the builds, planks, gold and hours, so you can size the grind before spending 75,000 on a garden you may not need yet.
For which method to run in that house, see the 1-99 Construction training methods guide.
Sources for this house layout guide
House mechanics, relocation rules and room requirements come from the OSRS Wiki player-owned house and individual room pages, and are fixed game mechanics. Servant levels, fees, capacities and trip times come from the wiki servant comparison table. The single plank-price comparison uses Grand Exchange prices checked on 25 August 2026; the GE price tracker has current values.